This document captures the details
of the transition from ManageEngine IT360 MSP Edition to
ManageEngine Point Products.
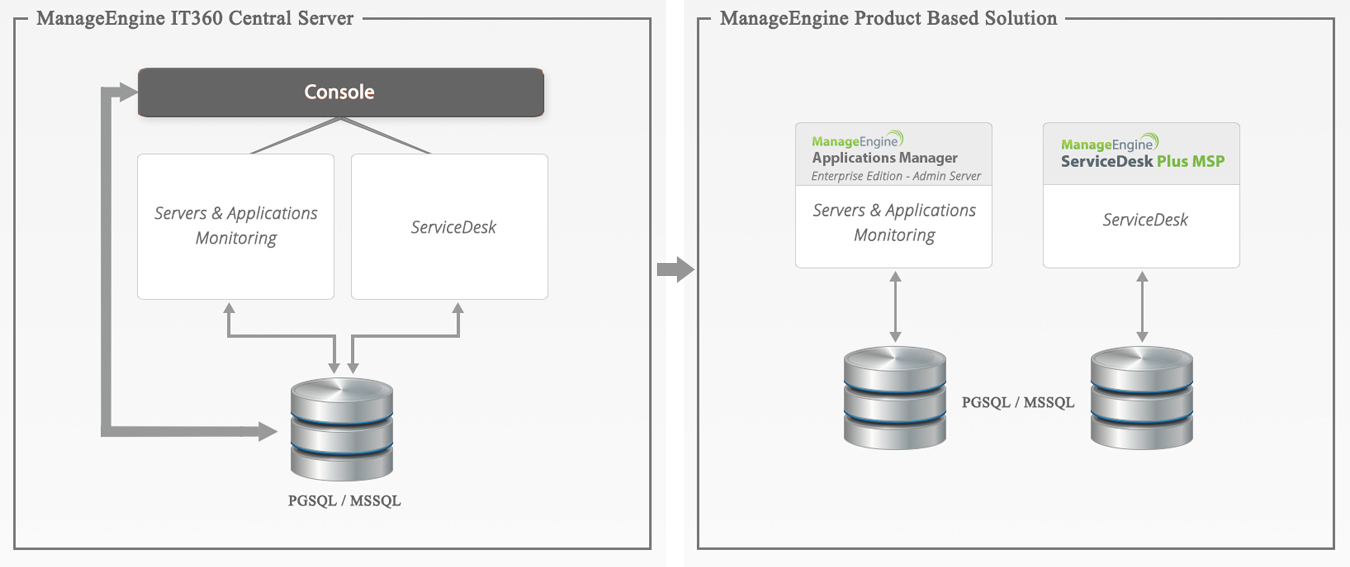
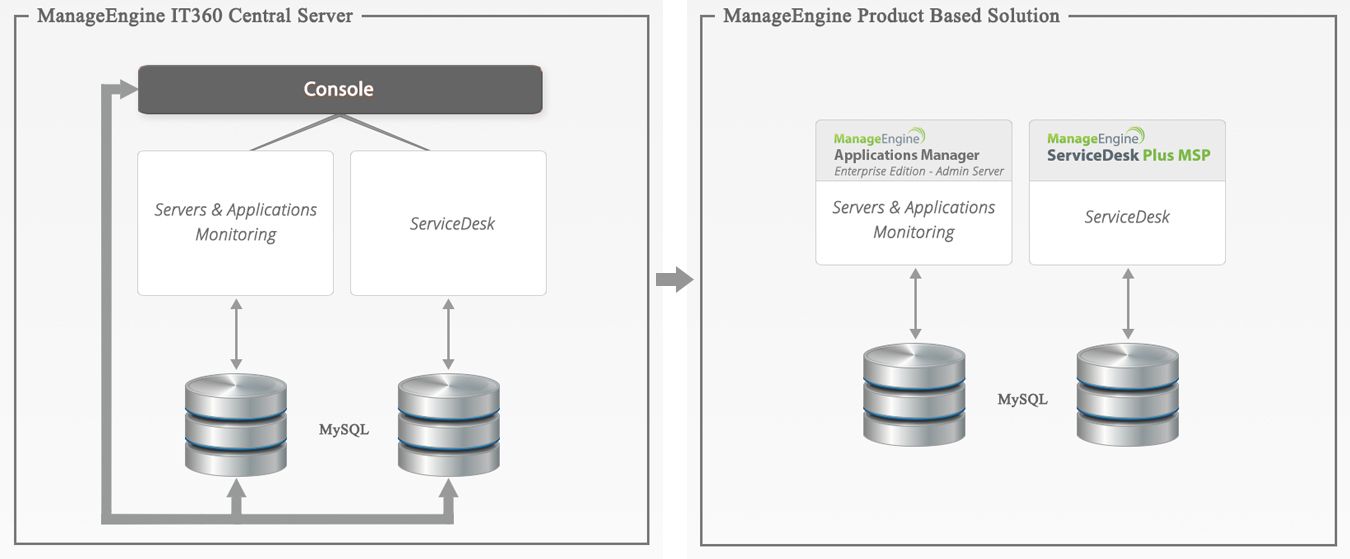
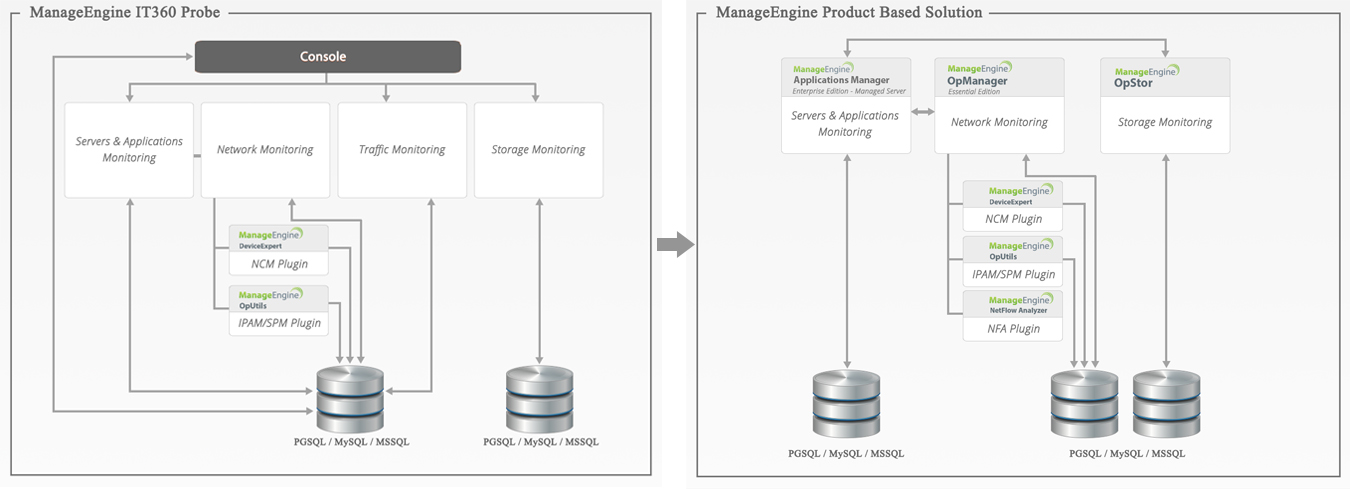
Product Architecture Overview
The below image captures the list
of ManageEngine products integrated within IT360 and also how the
architecture looks like post migration to ManageEngine point products:
ManageEngine IT360 installation using Microsoft SQL & PostgreSQL databases

ManageEngine IT360 installation using MySQL database
Alternative ManageEngine Products & Prerequisites for data migration
IT360 version to migrate from | For functionality | ManageEngine point product version to migrated to
|
| IT360 Release 10500 | Server & Applications monitoring | ManageEngine Applications Manager Enterprise Edition - Release 11937
Download Link |
| IT360 Release 10500 | Network monitoring | ManageEngine OpManager Essential Edition - Release 11400
Download Link |
| IT360 Release 10300, 10400 or 10500 | ServiceDesk
| ServiceDesk Plus MSP 8208
Download Link |
| IT360 Release 10010, 10020, 10100 or 10110 | ServiceDesk | ServiceDesk Plus MSP - Release 8104
Download Link |
Notes:
- If your
IT360 setup is running the older version than the ones captured in the
above table, you need to upgrade to the respective versions to perform
the data migration. You can refer the Service Packs page for the
procedure to upgrade to the latest version and to download the Service
Packs.
- Please install the ManageEngine point products and
start the service once before initiating the data migration procedure.
- Customers need to work with their respective Sales Contact to get the license for the alternate ManageEngine Products, provided you have a valid IT360 license and AMS contract.
- Customer using OpStor/Storage integrated with IT360, need to disintegrate OpStor from IT360, so that it would continue to run as a standalone product. This could later be plugged in to Applications Manager or OpManager.
- Customer using Traffic Module in IT360, need to install NFA Plugin (Netflow Analyzer) with OpManager and reconfigure the devices to forward all its flows to the new NFA plug-in installed server. Please note that migration is not supported for traffic module in IT360.
- Once Migration is completed, it is highly recommended to upgrade the point products (AppManager, OpManager, & Servicedesk Plus ) to their latest builds available. Please perform these upgrades as part of this migration activity to avoid another downtime.
Database to be used with alternative ManageEngine products
| Applications Manager
| OpManager
| ServiceDesk Plus MSP
|
IT360 installed with Microsoft SQL Server
| Microsoft SQL Server
| Microsoft SQL Server
| Microsoft SQL Server
|
IT360 installed with MySQL
| Since
MySQL is no more packaged with the ManageEngine Products, it has to be
installed with PostgreSQL database. It will be switched to MySQL when
you follow the data migration steps.
| Since
MySQL is no more packaged with the ManageEngine Products, it has to be
installed with PostgreSQL database. It will be switched to MySQL when
you follow the data migration steps. | Since MySQL is no more packaged with the ManageEngine
Products, it has to be installed with PostgreSQL or Microsoft SQL database.
|
IT360 installed with PostgreSQL | PostgreSQL
| PostgreSQL | PostgreSQL |
Data migration Procedure
The below section captures the detailed steps to migrate data from IT360 MSP Edition to multiple ManageEngine products that offers
equivalent core functionality:
Customers using PostgreSQL database
1. Steps to be performed in the IT360 Central server installation:
- Stop IT360 Central
- Start the PostgreSQL database. Default port is 33366. Can be found in <IT360-Home>\conf\database_params.conf
- <IT360-Home>\bin>startDB.bat
- Take backup of the database used by Central Server (centralAMDB) by executing the following command
- <IT360-Home>\pgsql\bin>pg_dump -U postgres --port=33366 -v -c AMDB > Central_AMDB_backup
- 33366 - DB port
- -c AMDB - Name of the database to be dumped
- Central_AMDB_backup - The desired filename of the dump. This gets stored in <IT360-Home>\pgsql\bin
- Download the attached Backupdata.bat file and paste it under <IT360-Home>\servicedesk\bin
- Take a backup of the database used by ServiceDesk (servicedesk) by executing the below command
- <IT360-Home>\servicedesk\bin> Backupdata.bat --trimmed
- Time stamped central_ServicedeskDB_backup file gets stored in <IT360-Home>\servicedesk\trimmedbackup
- Take a backup of the following folders
- <IT360-Home>\servicedesk\fileattachments
- <IT360-Home>\servicedesk\inlineimages
2. Steps to be performed in the IT360 Probe installation:
- Stop IT360 Probe
- Start the PostgreSQL database. Default port is 33366. Can be found in <IT360-Home>\conf\database_params.conf
- <IT360-Home>\bin>startDB.bat
- Take a backup of the database used by Servers and Applications module (probeAMDB) by executing the following command
- <IT360-Home>\pgsql\bin>pg_dump -U postgres --port=33366 -v -c AMDB > probe_AMDB_backup
- 33366 - DB port
- -c AMDB - Name of the database to be dumped
- probe_AMDB_backup - The desired filename of the dump. This gets stored in <IT360-Home>\pgsql\bin
- Take a backup of the database used by the Networks module (probeOpManagerDB) by executing below command
- <IT360-Home>\pgsql\bin>pg_dump -U postgres --port=33366 -v -c OpManagerDB > probe_OpManagerDB_backup
- 33366 - DB port
- -c OpManagerDB - Name of the database to be dumped
- probe_OpManagerDB_backup - The desired filename of the dump. This gets stored in <IT360-Home>\pgsql\bin
3. Steps to be performed in the Applications Manager Admin Server installation:
- Stop the Admin Server of Applications Manager
- Copy the central_AMDB_backup from <IT360-Home>\pgsql\bin to <Applications Manager-Home>\working\pgsql\bin
- Start the database by executing the following command
- <Applications Manager-Home>\working\bin>startPGSQL.bat
- Restore the data into standalone Applications Manager's database with the following command
- <Applications Manager-Home>\working\pgqsl\bin>psql.exe -p 15432 -U postgres -d amdb -f central_AMDB_backup
- Enter appmanager as the password when it prompts
- 15432 - DB port of Applications Manager. Refer this from <Applications Manager-HOME>/conf/AMServer.properties. Parameter - db.server.port
- -d amdb - The database of standalone Applications Manager to which the data is dumped to
- central_AMDB_backup - The copy of the database used by Servers and Applications module in IT360
- Download the attached IT360Migration-APM.zip and extract it under <Applications Manager-Home>
- Run the migration script as mentioned here
- <Applications Manager-Home>\working>IT360Migration.bat
- Start the Applications Manager
- Apply latest equivalent license (License.xml)
- Launch Applications Manager web console -> Admin -> Managed Server, Edit and update the probe details.
- Run the Drop Triggers query under the Applications Manager DB(amdb)
4. Steps to be performed in the ServiceDesk Plus MSP installation:- Stop ServiceDesk
- Copy the central_ServicedeskDB_backup file from <IT360-Home>\servicedesk\backup to <ServiceDesk Plus-Home>\backup
- Copy the following backed up folders to <ServiceDesk Plus-Home>\
- <IT360-Home>\servicedesk\fileattachments
- <IT360-Home>\servicedesk\inlineimages
- Start the database by executing the following command
- <ServiceDesk Plus-Home>/bin>startdb.bat 65432
- 65432 - Servicedesk's DB port, Refer this from <ServiceDesk Plus-Home>\server\default\deploy\postgres-ds.
- Goto <ServiceDesk Plus-Home>\pgsql\data\pg_hba.conf file uncomment the below PGSQL configuration
- host all all 127.0.0.1/32 trust
- host all all ::1/128 trust
- Restore the data into standalone servicedesk's database with the following command
- <ServiceDesk Plus-Home>\bin>restoredata.bat, In wizard Browse and select servicedeskDB_backup file
- central_ServicedeskDB_backup - The copy of the servicedesk DB taken from IT360
- click CLOSE button in wizard after the restoration is successfull
- Start the database by executing command <ServiceDesk Plus-Home>/bin>startdb.bat 65432
- Connect the servicedesk database with following command
- <ServiceDesk Plus-Home>\pgqsl\bin>psql.exe -U postgres -p 65432
- 65432 - Servicedesk'DB port
- change DB using command postgres=# \c servicedesk
- Update
username as Administrator by executing below queries: [Ensure if no
other Admin users are present. If so, update only the details of default
Admin]
- update aaauser set first_name='administrator' where first_name='admin'
- update aaalogin set name='administrator' where name='admin' and domainname='-'
- Update password as admin for all user
- update
AaaPassword set password='2+uYvE3SLfO3XaHl+CaGLA==',
SALT='1103287238602' where password_id in (select ap.password_id from
aaaaccpassword ap left join aaaaccount ac on ac.account_id=ap.account_id
left join aaalogin al on al.login_id=ac.login_id);
- Start the ServiceDesk and login with below credentials
- username: administrator ; password: admin
- Apply latest equivalent license (ServiceDesk_Plus_MSP_License.xml)
- Launch ServiceDesk web console -> Admin -> Technicians -> Edit Technicians, Generate API Key (Ignore if already exists)
- Launch Applications Manager web console -> Admin -> Addon Settings and update Servicedesk MSP host with Rest API details.
- Launch Applications Manager web console -> Admin -> Actions -> Create a new Ticket and Execute it
- Launch ServiceDesk web console -> Requests, Executed Tickets action will be listed.
- Re-Sync Active Directory and LDAP.(NOTE: Once AD users are resynched, their passwords will be synced from AD. Any Manually created local users will be having their passwords set as 'admin'. Those local authentication users would need to change their password at their first logon in the standalone Servicedesk Plus)
- Remove OLD Backup related names under "Admin -> backup".
- Re-enable Network and Domain scans.
- Re-sync Desktop Central
- Update the file attachments path under Admin -> Self-Service portal settings -> Configure a path for saving the attachments and save the configuration
- Update the backup location path under Admin -> Backup Scheduling -> Edit Scheduling and save the configuration
- Run the Drop Triggers query under the Servicedesk Plus DB(servicedesk)
5. Steps to be performed in the Applications Manager Managed Server installation:
- Stop the Managed Server of Applications Manager
- Copy the probe_AMDB_backup from <IT360-Home>\pgsql\bin to <Applications Manager-Home>\working\pgsql\bin
- Start the database by executing the following command
- <Applications Manager-Home>\working\bin>startPGSQL.bat
- Restore the data into standalone Applications Manager's database with the following command
- <Applications Manager-Home>\working\pgqsl\bin>psql.exe -p 15432 -U postgres -d amdb -f probe_AMDB_backup
- Enter appmanager as the password when it prompts
- 15432 - DB port of Applications Manager. Refer this from <Applications Manager-HOME>/conf/AMServer.properties. Parameter - db.server.port
- -d amdb - The database of standalone Applications Manager to which the data is dumped to
- probe_AMDB_backup - The copy of the database backup used by Servers and Applications module of the IT360 Probe
- Download the attached IT360Migration-APM.zip and extract it under <Applications Manager-Home>
- Run the migration script as mentioned here
- <Applications Manager-Home>\working>IT360Migration.bat
- Start the Applications Manager
- Apply latest equivalent license (License.xml)
- Run the Drop Triggers query under the Applications Manager DB(amdb)
- Reconfigure SMS server settings, if done already
- Launch Applications Manager web console -> Admin-> User Management, click on Admin user and update password with 'admin' password again.
6. Steps to migrate data from IT360 Networks module to OpManager Essential Edition:
- Stop OpManager
- Copy the OpManagerDB_backup from <IT360-Home>\pgsql\bin to <OpManager-Home>\pgsql\bin
- Start the database by executing the following command
- <OpManager-Home>/bin>startPGSQL.bat
- Goto <OpManager-Home>\pgsql\data\pg_hba.conf file uncomment the below PGSQL configuration
- host all all 127.0.0.1/32 trust
- host all all ::1/128 trust
- Restore the data into standalone OpManager's database with the following command
- <OpManager-Home>\pgqsl\bin>psql.exe -p 13306 -U postgres -d OpManagerDB -f OpManagerDB_backup
- 13306 - OpManager's DB port
- -d OpManagerDB - The database of standalone OpManager to which the data is dumped to
- OpManagerDB_backup - The copy of the OpManager DB taken from IT360
- Download the attached IT360Migration-opm.zip and extract it under <OpManager-Home>
- Run
the migration script in the following manner. The details of Applications Manager are
to be provided to the script. Its not necessary that the Applications Manager should be
running at this point of time.
- <OpManager-Home>>IT360Migration.bat <APM-protocol> <APM-Host> <APM-Port>
- APM-Protocol - http or https in which Applications Manager is running
- APM-Host - The host in which Applications Manager is running
- APM-Port - The port in which Applications Manager is listening
- example :- c:\opm>IT360Migration.bat http apm-host 9090
- Start the OpManager
- Apply latest equivalent license (license.xml)
- Launch Applications Manager web console -> Admin -> Addon Settings and update OpManager host details. (User as admin/admin).
Customers using Microsoft SQL Server database
1. Steps to be performed in the IT360 Central Server installation:
- Stop IT360 Central
- Take a backup of the database used by Servers and Applications module of IT360 Central Server (centralAMDB) using SQL studio
- Take a backup of the database used by ServiceDesk module of IT360 Central Server (centralservicedeskDB) using SQL studio
- Take a backup of the following folders
- <IT360-Home>\servicedesk\fileattachments
- <IT360-Home>\servicedesk\inlineimages
2. Steps to be performed in the IT360 Probe installation:
- Stop IT360 Probe
- Take a backup of the database used by Servers and Applications module of IT360 Probe (probeAMDB) using SQL studio
- Take a backup of the database used by Networks module of IT360 Probe (probeOpManagerDB) using SQL studio
3. Steps to be performed in the Applications Manager Admin Server installation:
- Stop the Admin Server of Applications Manager
- Restore the database backed up from the Servers and Applications module of IT360 Central Server into the database used by Admin Server of Applications Manager using SQL studio
- Download the attached IT360Migration-APM.zip and extract it under <Applications Manager-Home>
- Run the migration script as mentioned here
- <Applications Manager-Home>\working>IT360Migration.bat
- Start the Admin server of Applications Manager
- Apply latest equivalent license (License.xml)
- Launch Applications Manager web console -> Admin -> Managed Server, Edit and update the probe details.
- Run the Drop Triggers query under the Applications Manager DB(amdb)
4. Steps to be performed in the ServiceDesk Plus MSP installation: - Stop ServiceDesk Plus
- Restore the database used by IT360 ServiceDesk into ServiceDesk Plus database using SQL studio
- Copy the following backed up folders to <ServiceDesk Plus-Home>\
- <IT360-Home>\servicedesk\fileattachments
- <IT360-Home>\servicedesk\inlineimages
- Update
username as Administrator by executing below queries: [Ensure if no
other Admin users are present. If so, update only the details of default
Admin]
- update aaauser set first_name='administrator' where first_name='admin'
- update aaalogin set name='administrator' where name='admin' and domainname='-'
- Update password as admin for all user
- update
AaaPassword set password='2+uYvE3SLfO3XaHl+CaGLA==',
SALT='1103287238602' where password_id in (select ap.password_id from
aaaaccpassword ap left join aaaaccount ac on ac.account_id=ap.account_id
left join aaalogin al on al.login_id=ac.login_id);
- Start the Servicedesk and login with below credentials
- username: administrator ; password: admin
- Apply latest equivalent license (ServiceDesk_Plus_MSP_License.xml)
- Re-Sync Active Directory and LDAP.(NOTE: Once AD users are resynched, their passwords will be synced from AD. Any Manually created local users will be having their passwords set as 'admin'. Those local authentication users would need to change their password at their first logon in the standalone Servicedesk Plus)
- Remove OLD Backup related names under "Admin -> backup".
- Re-enable Network and Domain scans.
- Re-sync Desktop Central
- Update the file attachments path under Admin -> Self-Service portal settings -> Configure a path for saving the attachments and save the configuration
- Update the backup location path under Admin -> Backup Scheduling -> Edit Scheduling and save the configuration
- Run the Drop Triggers query under the Servicedesk Plus DB(servicedesk)
5. Steps to be performed in the Applications Manager Managed Server installation:
- Stop the Managed Server of Applications Manager
- Restore the data backed up from the Servers and Applications module of IT360 Probe into the Managed Server of Applications Manager using SQL studio
- Download the attached IT360Migration-APM.zip and extract it under <Applications Manager-Home>
- Run the migration script as mentioned here
- <Applications Manager-Home>\working>IT360Migration.bat
- Start the Managed Server of Applications Manager
- Apply latest equivalent license (License.xml)
- Run the Drop Triggers query under the Applications Manager DB(amdb)
- Launch Applications Manager web console -> Admin -> Addon Settings and update OpManager host details. (User as admin/admin).
- Reconfigure SMS server settings, if done already
- Launch Applications Manager web console -> Admin-> User Management, click on Admin user and update password with 'admin' password again.
6. Steps to migrate data from IT360 Networks module to OpManager Essential Edition:
- Stop OpManager
- Restore the data backed up from Networks module of IT360 Probe into OpManager's database using SQL studio
- Download the attached IT360Migration-opm.zip and extract it under <OpManager-Home>
- Run
the migration script in the following manner. The details of Applications Manager are
to be provided to the script. Its not necessary that the Applications Manager should be
running at this point of time.
- <OpManger-Home>>IT360Migration.bat <APM-protocol> <APM- probe Host> <APM-Port>
- APM-Protocol - http or https in which Applications Manager is running
- APM-Host - The host in which Applications Manager Managed Server is running
- APM-Port - The port in which Applications Manager is listening
- example :- c:\opm>IT360Migration.bat http apm-host 9090
- Start the OpManager
- Apply latest equivalent license (license.xml)
Customers using MySQL database
1. Steps to be performed in the IT360 Central Server installation:
- Stop IT360 Central Server
- Take a backup of the mysql folder from IT360 setup.
- Download the attached Backupdata.bat file and paste it under <IT360-Home>\servicedesk\bin
- Take a backup of the database used by ServiceDesk module by executing below command
- <IT360-Home>\servicedesk\bin> Backupdata.bat --trimmed
- Time stamped central_ServicedeskDB_backup file gets stored in <IT360-Home>\servicedesk\trimmedbackup
- Take a backup of the following folders
- <IT360-Home>\servicedesk\fileattachments
- <IT360-Home>\servicedesk\inlineimages
2. Steps to be performed in the IT360 Probe installation:
- Stop IT360 probe
- Take a backup of the mysql folder from IT360 setup.
3. Steps to be performed in the Applications Manager Admin Server installation:
- Stop the Admin Server of the Applications Manager
- Copy the mysql folder from <IT360-Home> to <Applications Manager-Home>\working
- Delete the my file (if exists) (<Applications Manager-HOME>\working\mysql)
- Rename the my-defaults file as my (<Applications Manager-HOME>\working\mysql)
- Do the following changes in <Applications Manager-Home>\conf\AMServer.properties
- Change the value from am.dbserver.type=pgsql to am.dbserver.type=mysql
- Change the value from am.db.port=15342 to am.db.port=32268
- Comment the encryptedpassword field in <Applications Manager-Home\working\conf\MySQL\database_params.conf
- (e.g) #encryptedpassword eK6q1CJ9697s7O AppModules TopoDB-MapDB-EventDB-AlertDB-PollDB-PolicyDB-USERSTORAGEDB-ApplnDB
- Download the attached IT360Migration-APM.zip and extract it under <Applications Manager-Home>
- Start Applications Manager service and launch the web console
- Stop Applications Manager service
- Start database by executing the following command
- <Applications Manager-Home>/working/bin>startMySql.bat
- Connect the mysql database instance and execute the following commands to delete the unwanted databases
- <Applications Manager-Home>\mysql\bin>mysql.exe -U root -p 32268
- mysql>drop database consoledb
- mysql>drop database OpManagerDB
- mysql>drop database netflow
- mysql>drop database servicedesk
- Run the migration script as mentioned here
- <Applications Manager-Home>\working>IT360Migration.bat
- Stop database by executing the following command
- <Applications Manager-Home>/working/bin>stopMySql.bat
- Replace the attached insertbulkqueries.bat file under <Applications Manager-Home>\working\bin\ folder
- Start the Applications Manager
- Apply latest equivalent license (License.xml)
- Launch Applications Manager web console -> Admin -> Managed Server, Edit and update the probe details.
- Run the Drop Triggers query under the Applications Manager DB(amdb)
- Reconfigure SMS server settings, if done already
4. Steps to be performed in the ServiceDesk Plus MSP installation:
- If the database planned to be used for ServiceDesk Plus is PostgreSQL, refer the link for procedure.
- If the database planned to be used for ServiceDesk Plus is Microsoft SQL, refer the link for procedure.
5. Steps to be performed in the Applications Manager Managed Server installation:
- Stop the Managed Server of Applications Manager
- Copy the mysql folder from <IT360-Home> to <Applications Manager-Home>\working
- Delete the my file (if exists) (<Applications Manager-HOME>\working\mysql)
- Rename the my-defaults file as my (<Applications Manager-HOME>\working\mysql)
- Do the following changes in <Applications Manager-Home>\conf\AMServer.properties
- Change the value from am.dbserver.type=pgsql to am.dbserver.type=mysql
- Change the value from am.db.port=15342 to am.db.port=32268
- Comment the encryptedpassword field in <Applications Manager-Home\working\conf\MySQL\database_params.conf
- (e.g) #encryptedpassword eK6q1CJ9697s7O AppModules TopoDB-MapDB-EventDB-AlertDB-PollDB-PolicyDB-USERSTORAGEDB-ApplnDB
- Download the attached IT360Migration-APM.zip and extract it under <Applications Manager-Home>
- Start Applications Manager service and launch the web console
- Stop Applications Manager service
- Start database by executing the following command
- <Applications Manager-Home>/working/bin>startMySql.bat
- Connect the mysql database instance and execute the following commands to delete the unwanted databases
- <Applications Manager-Home>\mysql\bin>mysql.exe -U root -p 32268
- mysql>drop database consoledb
- mysql>drop database OpManagerDB
- mysql>drop database netflow
- mysql>drop database servicedesk
- Run the migration script as mentioned here
- <Applications Manager-Home>\working>IT360Migration.bat
- Stop database by executing the following command
- <Applications Manager-Home>/working/bin>stopMySql.bat
- Start the Applications Manager
- Apply latest equivalent license (License.xml)
- Run the Drop Triggers query under the Applications Manager DB(amdb)
- Reconfigure SMS server settings, if done already
- Goto Admin-> User Management, click on Admin user and update password with 'admin' password again.
6. Steps to migrate data from IT360 Networks module to OpManager Essential Edition:
- Copy the mysql folder from <IT360-Home> to <OpManager-Home>
- Copy the MMMySQLDriver folder from <IT360 Home>\networks\mysql to <OpManager-Home>\mysql
- Copy the database_params.conf, DatabaseAliases.conf, DatabaseSchema.conf, DataManagement.dtd, DataManagement files from <IT360-Home>\networks\conf\Mysql to <OpManager-Home>\conf
- Rename the my-defaults file as my-huge (<OpManager-HOME>\mysql)
- Change the mysql port as 3306 in <OpManager-Home>\conf\database_params.conf
- 3306 - OpmanagerDB's port
- Do the following changes in <OpManager-Home>\conf\wrapper.conf
- Change the value from Ddb.home=pgsql to Ddb.home=mysql (e.g) wrapper.java.additional.2=-Ddb.home=mysql
- Add additional parameter as last entry for mysql driver (e.g) wrapper.java.classpath.15=mysql/MMMySQLDriver/mysql_connector.jar
- Start the Mysql database by executing the following command
- <OpManager-Home>/bin>startMySql.bat
- Connect the mysql database instance and execute the following commands to delete the unwanted databases
- <OpManager-Home>\mysql\bin>mysql.exe -U root
- mysql>drop database consoledb
- mysql>drop database AMDB
- mysql>drop database netflow
- mysql>drop database servicedesk
- Download the attached IT360Migration-opm.zip and extract it under <OpManager-Home>
- Run
the migration script in the following manner. The details of Applications Manager are
to be provided to the script. Its not necessary that the Applications Manager should be
running at this point of time.
- <OpManager-Home>>IT360Migration.bat <APM-protocol> <APM-Host> <APM-Port>
- APM-Protocol - http or https in which Applications Manager is running
- APM-Host - The host in which Applications Manager is running
- APM-Port - The port in which Applications Manager is listening
- example :- c:\opm>IT360Migration.bat http apm-host 9090
- Start the OpManager
- Apply latest equivalent license (license.xml)
- Launch Applications Manager web console -> Admin -> Addon Settings and update OpManager host details. (User as admin/admin).
 Uploading ....